How to Tie an Otis 2 Inch Patch
I’m sure you are familiar with the typical gun cleaning patches – square, made of old t-shirt scraps, paper towel or whatever else you had laying around. My mom used to use old sheets… she’s frugal like that. They’re easy to use – just fold them in half and slide them through the slotted tip, or use a jag.
These DIY patches might save some pennies, but where they actually cost you is in your barrel. Traditional solvents will breakdown the synthetic material in your t-shirt square patch. While you are pulling out some of the carbon and fouling, you’re leaving behind a lot more than you think...
Some of our most frequently asked questions about using Otis gun cleaning products center around our patches. They are unique to the rest of the market, and they can be confusing to use at first. Otis gun cleaning patches are round and have slots in them. This makes them more versatile, as they can be used for a multitude of calibers AND they offer complete 360 degree cleaning with multiple uses per patch. We’ll show you in a minute.
Some customers have referred to our patch tying method as a form of origami, but it’s a simple art once you learn it, and one that your guns will thank you for. We've been told it resembles a flower when done correctly (gentleman – this is not an acceptable replacement to actual flowers, BTW).
Otis has three different types of patches. The 2” patch is excellent for small caliber cleaning and we recommend using it to clean .17cal through .223 cal firearms. The 2” patch has 3 slots in it, and you can use each patch up to 6 times. Use your discretion though – a really dirty gun might render the patch too dirty to use again.
To create a proper size swab, insert the airgun or small slotted tip into one of the slots in the patch. Take a pinch on the patch, pinching upward (like you are making a mountain, not a valley). Feed that portion through the slot in the tip. Pull the patch up and around the slotted tip. See the flower resemblance now? This makes a perfectly circular swab to get you that 360 degree coverage.

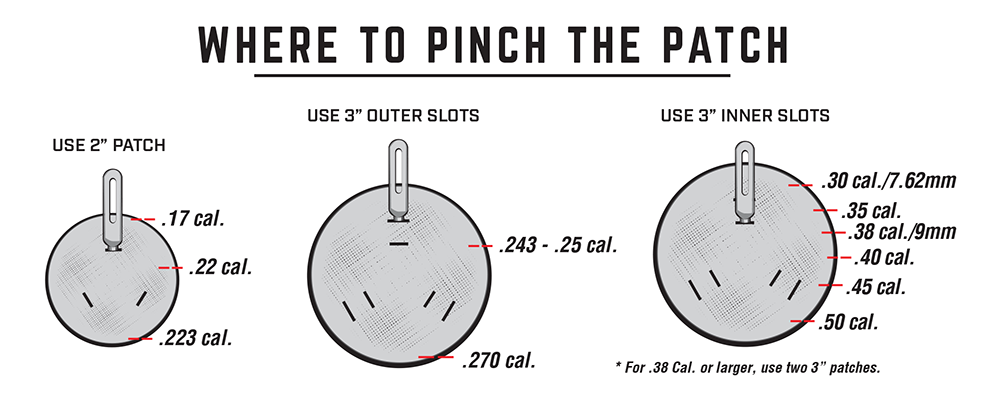
The versatility of the patch means you can clean multiple calibers with one patch size – but it can be a challenge to get the hang of where to pinch. The closer you pinch to the slotted tip, the smaller swab you’ll create. This graphic is a great guide on where to pinch for the proper caliber (show patch chart). Want to be doubly sure you don’t make too big of a patch? Start small and pull it through your firearm. If it’s too loose, make a slightly larger swab (make sure you remember where you pinched the first time).

All Otis cleaning kits come with instructions on how to clean properly from Breech-to-Muzzle® including where to pinch to create the proper swab… but in case you threw those away, we’ve got your back with this blog post, and even this video: